Showing posts with label htc. Show all posts

Saturday, 1 October 2016

Root HTC One & Install Recovery on HTC One [How to]

HTC one is the latest Smartphone from the HTC mobile, the device has the some awesome features and one of the competitor of Samsung Galaxy S4. Today in this post we let you know how you can Unlock the Bootloader of HTC one, Root HTC one and Install Recovery on HTC One. Rooting has lots of benefits, after rooting you can enjoy lots of customized roms on your device, customize your device as per your need and install rooted application on your device. The process is little bit long, but not so hard. Within a few minutes you can Root your device, to root your device first you have to install Custom recovery on your device.
Before you get down to rooting your HTC One, remember one thing follow the step one by one and don;t miss any step from the below guide, otherwise this will create some problem with your device, So read the instruction carefully again and again, then follow the instructions below.
Root HTC One & Install Recovery on HTC One
Disclaimer: Follow this guide at your own risk. HowToRootMobile.com won’t be responsible in case your device gets damaged in any other way during the process.
NOTE:-But Before following this guide download these files and do take the full backup of your device, so you can easily restore all your files and data on your device after the update.
b) Enable USB debugging mode on your device, read the guide here how to enable USB debugging mode.
Once the drivers is installed on your device and USB debugging mode is enabled on your device follow the below mention steps one bu one to update your device with the latest firmware.

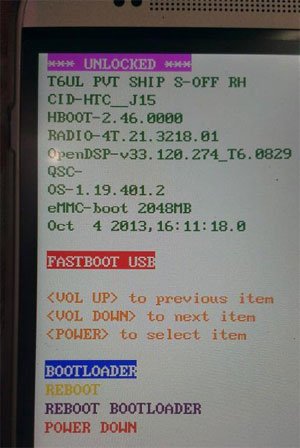
How to Root HTC one and Install Recovery – Step by Step Guide

Step 1. To Root You device first you have to Unlock the bootloader of your HTC one. The process is simple and take 5 to 10 minutes to unlock the Bootloader, here is the complete guide to Unlock the bootloader of HTC one.
Step 2. After Unlocking the bootloader. Download Recovery file from here to install recovery on your HTC One mobile. One downloaded the file extract the file in desktop and rename the file to “recovery.img”.
Step 3. After this download the fastboot package for HTC one and extract the contents to a folder. Now copy the recovery.img file (That you Downloaded on Step 2) into the Fastboot folder on your desktop.
Step 4. Now time to go on your HTC one mobile phone, On you HTC one Settings > Power and disable the Fast Boot option. It is important that this option be disabled for our Fastboot to work properly.
Step 5. Now turn off Your HTC one Smartphone and boot into fastboot mode(hold down the Power button and Volume Down key at the same time and then selecting ‘Fastboot’ from the menu using the ‘Power’ button), after that connect your device with a computer via USB cable.
Step 6. Now Go on your Computer and open the Fastboot folder on your desktop that you download on Step 3. Hold the Shift key down on your keyboard, and then Right-click inside the folder. Select Open Command Window Here from the right-click menu.
Step 7. Now on command prompt windows type the following command:
fastboot flash recovery recovery.img
That’s it!! now the custom recovery is installed on your device and you are ready to root your device, now follow the below mention steps to Root your HTC one smartphone.
Step 8. First download HTC one Rooting tool here. After that enable the USB Debugging on your HTC one.
Step 9. Now copy the above mention file on your HTC One device, Once the file is copied on your device. Turn off your device and reboot to recovery by pressing and holding the Volume Down + Power buttons till you see the Boot menu screen. Then press the Volume Down button till you see Recovery highlighted, and then press the Power button to boot to Recovery mode.
Step 10. Now your HTC one is in Recovery Mode, now all you have to Flash the file that you copied on your device via the recovery. So all you have to select “install zip from …” and then you need to select the HTC one Rooting tool which you have placed in your phone in the Step 9.
Once the zip file has been flashed, select the Reboot System option to reboot your HTC One. Now your HTC one is rooted and you enjoy all the custom ROMS and pother rooted application on your device.

Friday, 1 April 2016

How to Unlock, Install Custom Recovery And Root the HTC One A9

Before You Begin

1. This could void the warranty of your device. We won’t be held responsible for anything that happens from doing this tutorial so please proceed at your own risk.
2. You must have a Windows based PC to do this procedure.
3. You should have ADB drivers installed on your PC. If you don’t, your PC won’t be able to recognize your device.
4. This should erase all the data stored on your device, so please backup everything that you’ll need later on.
5. This should also flash a custom recovery on your device.

How to Root the HTC One A9

Root the HTC One A9
To root the device, you’ll first unlock the bootloader, flash a custom recovery, and then install the Superuser app on the device. Here’s how:

II. Downloading Required Files

1. Download Fastboot and save it to your desktop.
2. Download Custom Recovery and save it to your desktop.
Custom Recovery (Download link’s given in the first post)
3. Download SU and save it to your desktop.
SU (It’s attached in the first post)
4. Download Superuser and save it to your desktop.
Superuser (It’s attached in the first post)
5. Download Boot Image for your device model and save it to your desktop.
Boot Image (It’s attached in the first post)

III. Unlocking the Bootloader on the HTC One A9

1. Extract files from Fastboot over to your desktop by right-clicking on it and selecting Extract here.
2. Head over to the HTCDev Bootloader website and follow the instructions for getting an unlock token for your device using which you can unlock the bootloader on your device.
3. Make sure that the unlock token that you’ve received from HTC is named as Unlock_code.bin.
4. Turn off your device.
5. Turn your device back on in fastboot mode. To do that, hold down Volume DOWN and Power buttons together for a few seconds.
6. Select fastboot from the bootloader menu appearing on your device.
7. Plug in your device to your PC using a USB cable.
8. Launch a Command Prompt Window on your desktop by holding down Shift and right-clicking anywhere on the screen and selecting Open command window here.
9. Type in the following command into the Command Prompt Window and hit Enter:
fastboot devices
10. Your device should show up in the list.
11. Type in the following command and hit Enter:
fastboot flash unlocktoken Unlock_code.bin
12. Confirm the prompt on your device and your bootloader will be unlocked.
Now that your bootloader is unlocked, let’s flash the boot image that will then allow you to root your device. Here’s how:

IV. Flashing a Boot Image on the HTC One A9

1. Extract files from Boot Image archive over to your desktop by right-clicking on the archive and selecting Extract here.
2. Head to Menu > Settings > About phone on your device and tap on Build number for 7-8 times and it’ll say you’re a developer. That’ll unlock the developer options menu on your device.
3. Head to Menu > Settings > Developer options and turn on USB debugging.
4. Plug in your device to your PC using a USB cable.
5. Open a command prompt window on your desktop by holding down Shift and right-clicking anywhere on the screen and selecting Open command window here.
6. Type in the following command into the window and hit Enter:
adb devices
7. Your device should show up on the list.
8. Type in the following command and hit Enter:
adb reboot download
9. Your device should reboot into the download mode.
10. Enter in the following command into the command prompt window and press Enter. Make sure to replace bootimage.img with the actual name of the boot image that you have downloaded on your PC.
fastboot flash boot bootimage.img
11. Wait for it to flash the boot image on your device.
12. When the boot image has been flashed, issue the following command to reboot into the bootloader mode:
fastboot reboot-bootloader
13. Select Recovery from the bootloader menu to boot into the recovery mode.
14. Select wipe data/factory reset from the recovery menu.
15. Confirm the prompt and wait for it to factory reset your device.
16. When factory resetting’s done, reboot your device.
The boot image was successfully flashed on your HTC One A9. Here’s how you can go about flashing a custom recovery on your device:

V. Flashing a Custom Recovery on the HTC One A9

1. Right-click on Custom Recovery and select Extract here to extract the recovery file.
2. Turn off your device.
3. Reboot your device into fastboot mode by holding down Volume DOWN and Power buttons together for a few seconds.
4. Choose fastboot from the options appearing on your screen.
5. Plug in your device to your PC using a USB cable.
6. Open a command prompt window on your desktop by holding down Shift and right-clicking anywhere on the screen and selecting Open command window here.
7. Type in the following command into the command prompt window and hit Enter. Make sure to replace recovery.img with the actual name of the recovery image that you’ve downloaded to your PC.
fastboot flash recovery recovery.img
8. Wait for it to flash a custom recovery on your device.
9. When it’s done flashing recovery, reboot your device.
You now have a custom recovery up and running on your HTC One A9. Here’s how you can go about rooting your device:

VI. Rooting the HTC One A9

1. Extract files from both SU and Superuser over to your desktop by right-clicking on each of them and selecting Extract here.
2. Turn off your device.
3. Turn your device back on in custom recovery mode. To do that, hold down Volume DOWN and Power buttons together for a few seconds.
4. Select Recovery from the bootloader menu and you’ll boot into the recovery mode.
5. Open a command prompt window on your desktop by holding down Shift and right-clicking anywhere on the screen and selecting Open command window here.
6. Type in the following command into the command prompt window and hit Enter:
mount /dev/block/mmcblk0p62 /data
7. It should mount the /data/ folder to write files.
8. Type in the following command and hit Enter:
adb push su.img /data/su.img
9. It’ll push SU over to the /data/ folder on your device.
10. Reboot your device using the reboot system now option in the recovery menu.
11. Ensure that your device is still plugged in to your PC.
12. Type in the following command into the command prompt window and hit Enter:
adb install superuser.apk
13. It should install the Superuser app on your device.
14. You should now be rooted!

How to Install Custom Recovery And Root the HTC Incredible S

Before You Begin

  1. This could void the warranty of your device. We won’t be held responsible for anything that happens from doing this tutorial so please proceed at your own risk.
  2. This will erase the data stored on your device. So, please backup everything that you wish to keep.
  3. You must have a Windows based PC to do this procedure.
  4. You should have HTC Sync installed on your Windows PC. Install it if it isn’t already.
  5. This should also flash a custom recovery on your device.
  6. You should only try this on an HTC Incredible S.

How to Root the HTC Incredible S

Root HTC Incredible S
To root the device, you’ll first unlock the bootloader, flash a custom recovery, and then use that recovery to flash SuperSU to get root. Here’s how:

Downloading Required Files

  1. Download Fastboot and save it to your desktop.
    Fastboot
  2. Download ClockworkMod Recovery and save it to your desktop.
    ClockworkMod Recovery (Download the one that is for your device)
  3. Download SuperSU and save it to your desktop.
    SuperSU

Unlocking the Bootloader on the HTC Incredible S

  1. Extract files from Fastboot over to your desktop by right-clicking on it and selecting Extract here.
  2. Enable USB debugging on your device by heading to Menu > Settings > Developer options > USB debugging.
  3. Plug in your device to your PC using a USB cable.
  4. Launch a command prompt window on your desktop by holding down Shift and right-clicking anywhere on the screen and selecting Open command window here.
  5. When the command prompt window launches, type in the following command and hit Enter:
    adb reboot bootloader
  6. Your device should reboot into bootloader mode.
  7. Now, type in the following command and press Enter:
    fastboot oem get_identifier_token
  8. You’ll see a long text string in the command prompt window. Highlight it all and copy it to your clipboard for later use. Make sure you only copy the string and not words like <bootloader>, etc.
  9. Head over to the HTCDev Bootloader website and follow the on-screen instructions for unlocking the bootloader on your device.
  10. At one step, the site will ask you to input the string that you copied in the above steps. Paste the string and click on Submit.
  11. Once you’ve submitted the string to HTC, they’ll email you an unlock file. Download that file and save it to your desktop.
  12. Get back to command prompt and type in the following command and hit Enter:
    fastboot flash unlocktoken Unlock_code.bin
  13. Hit Yes when prompted for unlocking the bootloader on your device.
  14. Your bootloader should now be unlocked.
Congrats! Your device is now ready to be flashed with a custom recovery to then be rooted. Here’s how to flash a custom recovery:

Flashing a Custom Recovery on the HTC Incredible S

  1. Enable USB debugging on your device by heading to Menu > Settings > Developer options > USB debugging.
  2. Plug in your device to your PC using a USB cable.
  3. Open a command prompt window on your desktop by holding down Shift and right-clicking anywhere on the screen and selecting Open command window here.
  4. Type in the following command into the command prompt window and hit Enter:
    adb reboot bootloader
  5. Your device should reboot into bootloader mode.
  6. Type in the following command into the command prompt window and press Enter. Make sure to replace cwm.img with the actual name of the ClockworkMod Recovery Image you have downloaded.
    fastboot flash recovery cwm.img
  7. Wait for it to flash CWM on your device.
  8. When it’s done flashing CWM, reboot your device using the following command:
    fastboot reboot
  9. Your device should reboot.
Great! A custom recovery has been successfully flashed on your HTC Incredible S, and here’s how you can use this newly installed recovery to achieve root on your device:

Rooting the HTC Incredible S

  1. Connect your device to your PC using a USB cable.
  2. Copy SuperSU .zip from your desktop over to the internal SD card storage on your device.
  3. When SuperSU is copied, disconnect your device from your PC.
  4. Turn off your device.
  5. Turn your device back on in recovery mode by holding down Volume DOWN and Power buttons together.
  6. Choose Recovery from the options available on your screen.
  7. Select install zip from sdcard in the recovery menu.
  8. Select choose zip from sdcard on the screen that follows.
  9. Choose SuperSU .zip to be installed on your device.
  10. Hit Yes when prompted.
  11. CWM should begin flashing SuperSU on your device. Wait for it to do so.
  12. When CWM’s done flashing SuperSU, reboot your device by selecting reboot system now.
  13. Your device should reboot.
And there you go, your HTC Incredible S is now rooted!

Tuesday, 4 February 2014

How to Root HTC Desire 500 (Dual Sim)


Before You Begin:

  1. You need a Windows Based PC or Laptop for this method.
  2. You device must have Custom Recovery installed. Click Here for flashing Custom Recovery.
  3. Download & Install HTC Butterfly Drivers from Here
  4. Enable USB Debugging on your device.Click Here if you don’t know how to enable.
  5. You device must be charged 50% minimum.
  6. We recommend you to make a Backup of you data for safety.

Download Required Files:

How to Root the HTC Desire 500:

  • Connect your device to your PC and copy CWM-SuperSU-v0.98.zip to your device’s SD card.
  • Boot your device to recovery mode.  To do this:
i.  Power off your device, take the battery out and put it back in.
ii.  Press and hold the Volume Down + Power buttons until you see a screen with choices.
iii.  Navigate to Recovery using the Volume keys and use the Power button to select the option.
  • Select ‘Install zip from sdcard‘ and then navigate to the location of CWM-SuperSU-v0.98.zip.  Use the Power button to select the file and then select yes to start flashing the zip file.
  • Once flashed, go to the main menu and select select ‘reboot system now‘.
  • That’s it!  You are now rooted and if you don’t believe it, look for the Superuser app in your app drawer or use apps like Root Checker Lite to confirm!

How to Install Custom Recovery on HTC Desire 500 (Dual SIM)

Before You Begin:

  1. You need a Windows Based PC or Laptop for this method.
  2. Your device bootloader must be unlocked. DO IT FROM HERE
  3. Download & Install HTC Desire 500 Drivers from Here
  4. Enable USB Debugging on your device.Click Here if you don’t know how to enable.
  5. You device must be charged 50% minimum.
  6. We recommend you to make a Backup of you data for safety.

    Download Required Files:

    How to Install Custom Recovery:

    • Extract adb-fastboot.zip to a folder on your desktop.
    • Copy CWMRecovery_D500_Philz.img to the extracted folder.
    • Power down your device and boot into fastboot mode.  To enter fastboot mode, remove the battery and put it back in; then, press and hold the Volume Down + Power keys until your device enters fastboot mode.
    • Connect your device to your PC.  If there are any drivers being installed this point, let them do so before continuing.
    • Hold shift and right-click on the extracted adb-fastboot folder and then click on ‘Open command window here‘ to open up a command prompt window.
    • Run the following commands [ignore the text in the brackets as it is for information purposes only]:
    • fastboot devices {displays your device’s ID as a string of alphanumeric characters, signifying that your device is recognized and ready}
    • fastboot flash recovery CWMRecovery_D500_Philz.img {flashes the custom recovery to your device}
    • Now Reboot your device.

      Sunday, 22 December 2013

      How to S-OFF, Root and Install CWM/TWRP Recovery on HTC One Max

      Key features

      • Quad-band GSM/GPRS/EDGE support; 3G with HSPA; LTE
      • 5.9" 16M-color 1080p Super LCD3 capacitive touchscreen with 373ppi pixel density
      • Android OS v4.3 Jelly Bean with Sense UI 5.5
      • Quad-core 1.7 GHz Krait 300 CPU, 2 GB RAM, Adreno 320 GPU; Qualcomm Snapdragon 600 chipset
      • 4 MP autofocus "UltraPixel" camera with 1/3" sensor size, 2µm pixel size; LED flash
      • 2.1 MP front-facing camera, 1080p video recording
      • Wi-Fi a/b/g/n, Wi-Fi Direct and DLNA; Wireless TV-out (Miracast)
      • 16GB/32GB of built-in storage, expandable via a microSD slot

      Warnings:

      Below are some warning statements that you must be knowing before preparing to Root or Install Custom Rom in your HTC One Max Android Smartphone:
      • Rooting/Installing Custom ROM is not an authorized process hence you’ll be losing all your warranty benefits over your HTC One Max after Rooting/Installing it.
      • There are certain risks of damaging your Android Smartphone while Rooting/Installing Custom ROM in it. Hence, it is recommended that you proceed at your own risk and we are not to be held responsible even if your Smartphone gets damaged during or after completing the Rooting/Custom ROM installation process.
      • You might not receive any future official software or firmware updates after rooting and installing Custom ROM in your HTC One Max.

      Before You Begin:

      How To Root and Install CWM/TWRP Custom Recovery In HTC One Max:

      1. Copy the SuperUser.zip file to your phone.
      2. Download the CWM/TWRP recovery image file from above and copy it to “Android SDK Fastboot-ADB” folder. The location of the recovery file should be the same as fastboot and ADB files in the folder.
      3. Connect your HTC One Max to computer via USB cable (do not use USB 3.0).
      4. Now open a command prompt. To launch command box, press Shift key+Right-click on mouse and from the list of options, select “Open command window here”. Then type in the and issue the following command:
        adb devices
      5. If you can see the serial number of your device in the command box, it’s is properly connected.
      6. Now issue the following line to reboot your device in Bootloader mode:
        adb reboot bootloader
      7. When you enter the Bootloader/HBOOT mode, highlight FASTBOOT by pressing volume down key and select it using the power button:HTC One Max Unlocked
      8. Now open the “Android SDK Fastboot-ADB” folder. Make sure you have already copied the recovery .img file here.
      9. Launch a cmd window from within this folder (press Shift+Right-click on mouse) and type the command“fastboot flash recovery” followed by the name of the recovery image. For example, if you have downloaded the TWRP recovery image for the Verizon variant, type the following command line in the cmd window (you can replace the recover file name in Red with your own):
        fastboot flash recovery openrecovery-twrp-2.6.3.0-t6vzw.img
      10. Now hit the Enter key:
      11. Your favorite custom recovery will be installed to your HTC One Max within moments.
      12. Finally, go to REBOOT BOOTLOADER option and select it.
      13. Scroll to RECOVERY option and select it. You should now be taken to CWM or TWRP recovery interface.
      14. Now open “install zip from sdcard” (CWM) or “Install” (TWRP) option depending on your recovery.
      15. Navigate to the SuperUser.zip file and select it.
      16. Confirm the installation when prompted and let it be installed.
      17. When SuperUser is flashed, go to REBOOT option and select it.

      Saturday, 7 September 2013

      Top 5 Best Custom Roms For HTC One M7


      htc-one-mini-aluminium-1
      You have to Install Custom Recovery and Root your device
      Click Here for Root & Recovery Installing Method
      In July we write a article on Installing Android Google Edition On HTC One : Click Here if you want to install google edition

      Today we will provide you the list of top and the best 5 custom roms available for HTC One M7

      1. Android Revolution HD For HTC One:

      Month Back!! we write a article on Android Revolution HD Custom Rom for HTC One : Here
      Android Revolution HD is one of the most popular Custom Rom for HTC devices.Android Revolution HD is based on Android 4.2.2 jellybean and Developed by Mike1986  Recognized Developer from XDA.Android Revolution give a high quality performance to HTC One.Android Revolution didn't give your device new look because it is available in Stock Look only.

      FEATURES OF ANDROID REVOLUTION HD:

      • High Quality Performance
      • Super Stable & Fast
      • Full HTC Sense 5.0
      • Excellent Battery Life
      • Enabled GPU UI Rendering
      Click Here For All Features , Download Link & Instructions. Don’t forgot to Root & Install Custom Recovery.

      2. InsertCoin Custom Rom For HTC One:

      InsertRom is based on Android 4.2.2 jellybean developed by BadNewz named recognized developer from XDA.This Rom is reported as Super Fast , Stable with excellent battery life.It support all versions of HTC One International/All Careers.Many new tweaks & fixes is done by developer in it.

      FEATURES OF INSERTCOIN ROM:

      • Full HTC Sense 5.0
      • Based On Android 4.2.2
      • Super Fast & Stable
      • Better Performance than Stock
      • Fully Optimized
      Click Here For All Features , Download Link & Instructions. Don’t forgot to Root & Install Custom Recovery.

      3. ViperOne Custom Rom For HTC One M7:

      ViperOne Rom is popular from some last month.ViperOne Rom is based on Android 4.2.2 and developed by Turgea recognized developer from XDA.ViperOne provide OTA updates for its Rom.It comes with Aroma Installer mean during installation you can choose what you want to install.

      FEATURES OF VIPERONE ROM:

      • Aroma Installer
      • Stock Kernel
      • OTA Updates
      • Fully De-Odexed
      • Memory Optimized
      Click Here For All Features , Download Link & Instructions. Don’t forgot to Root & Install Custom Recovery.

      4. Maximus HD Custom Rom For HTC One M7:

      Maximus HD is also considered as one of the best and popular custom rom available of HTC One.Maximus HD is also available for other devices.Maximus HD is based on Android 4.2.2 jellybean.It is popular for its Fast & Stable performance.It also provide OTA updates it means you can get updates of this rom direct to your HTC One.

      FEATURES OF MAXIMUS HD ROM:

      • Super Fast & Stable
      • Android 4.2.2 Based
      • Full HTC Sense 5.0
      • OTA Updates
      • Excellent Battery Life
      Click Here For All Features , Download Link & Instructions. Don’t forgot to Root & Install Custom Recovery.

      5. RayGlobe 7.0 Custom Rom For HTC One:

      RayGlobe is new custom rom for HTC One but provide really good features.RayGlobe gives your device's a new look.Feature make him one of top 5 is his customization.RayGlobe also provide OTA updates if you want new version of this rom you don't have to download full Rom again get an update direct to your mobile.

      FEATURES OF RAYGLOBE 7.0 ROM:

      • Android 4.2.2 & HTC Sense 5 Based
      • Fully Customizable
      • Stock HTC Kernel
      • Excellent Battery life
      • Good Performance
      Click Here For All Features , Download Link & Instructions. Don’t forgot to Root & Install Custom Recovery.
      This are the Top 5 Best Custom Roms For HTC One
      If you are a developer & want to share your developments.Please join our EditAndroid Forum Here

      How To Root HTC One V Easy Method

      .
      htc-one-v

      How To Root HTC One V Easiest Method

      Before You Begin:

      1. You need a Windows Based PC or Laptop for this method.
      2. Your device bootloader must be unlocked. DO FROM HERE
      3. Download & Install HTC One V Drivers from Here
      4. Enable USB Debugging on your device.Click Here if you don't know how to enable.
      5. You device must be charged 50% minimum.
      6. We recommend you to make a Backup of you data for safety.

      Download Required Files:

      1. Root Package For HTC One V : Here
      2. Image File For HTC One V : Here

      Root HTC One V:

      1. Download & Extract the Root Package (Download Link Given Above).
      2. You will find a Image file in the extracted Root Package folder.
      3. Replace that image file with the Downloaded image file (Download Link Given Above).
      4. Turn off your device completely.
      5. Now boot your device in Fastboot mode.Press & hold Volume Down + Power Button and then select fastboot from the given options.
      6. Now you are in fastboot mode.
      7. Connect your device to computer with USB cable (Please install USB drivers first : Link given in Before You Begin section).
      8. Now open the extracted folder of Root Package.
      9. You will find a install-superboot-windows.bat file their.
      10. Run install-superboot-windows.bat file in your PC.
      11. Rooting process will automatically start now.
      12. Just wait for few time and let him finish his work.
      Congrats!!! your device is successfully rooted now....SuperUser app is installed in your device..